NOTE: We are no longer adding new features to Set List Maker. We recommend our newer product, BandHelper, for the latest design and functionality.
Sending MIDI from Set List Maker
Set List Maker can send MIDI bank and program changes, song select messages and virtually any other MIDI data when you change songs, and MIDI beat clock messages when you activate a tempo button. (It can also receive start/stop, song select, program change, controller and note messages to trigger various actions, as described on the App Control page.)
The iOS version uses Core MIDI, and should be compatible with class-compliant USB MIDI devices (via a Lightning USB adapter) as well as devices connected via wi-fi (RTP) or macOS and iOS devices connected via Bluetooth Low Energy.
The Android version, on Android 6 or later, can send and receive MIDI over USB (via a USB OTG cable) or Bluetooth. Older Android versions use a third-party framework that can send and receive MIDI over or USB or wi-fi (RTP). You can optionally use the old framework on newer Android versions with the Help > Utilities > Use Old MIDI Framework setting.
Note: MIDI support requires an in-app purchase. The total amount of MIDI data you send per song (bank and program changes, song select messages and raw MIDI) is limited to 64kb.
To register your MIDI devices with Set List Maker
Before sending MIDI to a device, you must add the device to your database. This allows you to see your MIDI device names in the app and quickly change the port or channel a device uses without having to edit all your MIDI data.
- Navigate to Settings > MIDI Devices, then tap the + button to add a
new device:

- Enter a device name and the channel on which that device listens for data. The name should be the device you're sending MIDI to, like a keyboard or effects processor, not a MIDI interface you're sending MIDI through to get to that device:
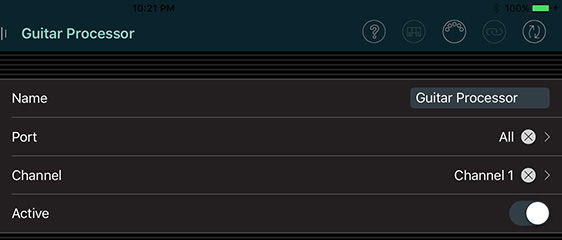
- You can also set the port, but it's best to leave that set to "All" unless you have a specific need to target one port (such as if different devices on different ports of a multi-port MIDI interface need to use the same channel).
- Some devices count MIDI values from 0-127 and others from 1-128. If you set the numbering style to match your device, you can then enter values using the same style to avoid confusion.
Please keep these notes in mind when entering your MIDI devices:
- You can only enter one device per channel per port.
- You can edit an existing device to change its name, port or channel at any time. There's no need to edit the associated program and control changes in your MIDI presets when you do that.
- If you delete a device, all program changes and control changes for that device will be deleted.
To send program changes, control changes or other MIDI data
- Navigate to MIDI Presets in the main menu and tap the + button at the top of the list to add a new MIDI preset.
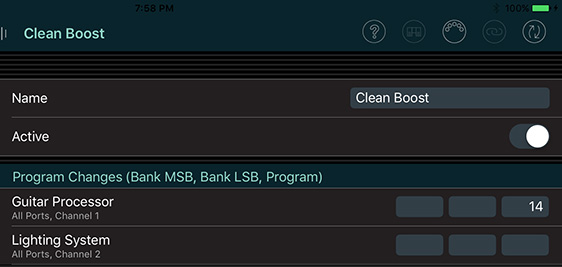
- For program changes, you'll see a set of three fields for each
MIDI device. The first field is the bank
change (MSB), the second field is the bank change
(LSB) and the third field is the program change. You can
enter any combination of MSB, LSB and program values,
leaving fields empty if you don't need them. Values are counted from 0-127 or 1-128 depending on the Numbering setting for the MIDI device.
- For control changes, you'll see a set of two fields for each MIDI device. The first field is the controller number and the second field is the value. Values are counted from 0-127 or 1-128 depending on the Numbering setting for the MIDI device. If you need to send multiple control changes to the same device, you can enter one, then save the MIDI preset with the manual save button in the bottom toolbar and new, empty row will appear. You can repeat those steps to add as many control changes as you need.
- For other MIDI data, you'll see one large text field labeled Raw MIDI. You can enter
any MIDI data in hexadecimal code; for example, to set channel
4's volume to 90, you would enter B3 07 5A. You can
find a complete list of MIDI message codes at gweep.net.
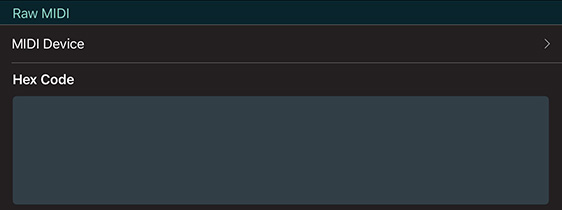
- If you want to annotate your raw MIDI code for future reference, you can include C-style comments: either from // to the end of the line, or from /* to */.
- If you want to only send the raw MIDI to one device, you can select the MIDI Device above the Raw MIDI field. If you want to send some raw MIDI to one device and some to another, you will need to create separate MIDI presets.
- You can attach other presets to a preset, so that when you trigger the parent preset, all the child presets are triggered automatically.
- Enter a name for this MIDI preset. The preset will be saved when you click the manual save button or leave this page.
- You can determine the order in which the parts of a MIDI preset are sent, from Settings > Audio & MIDI > MIDI Preset Order. If needed, you can also add a pause between the parts with the With Delay Between option.
- To test your preset, save it and then click its MIDI button
 in the MIDI Presets list. You can also click the MIDI button in the top toolbar to open the MIDI Status window and view your outgoing MIDI data in the Activity Log.
 - To use your MIDI presets in a performance, you'll want to attach them to songs. Navigate to Songs in the main menu and tap the edit button for a song.
- In the song edit
window, scroll down to the MIDI Presets list.
This will show any MIDI presets already attached to the song.

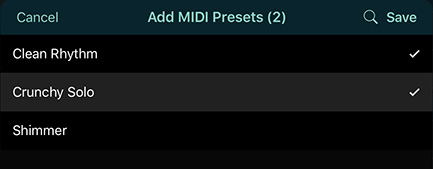
- To attach MIDI Presets, tap the Add MIDI Presets
button. This will open a list of all the MIDI presets defined in this database. You can tap
the presets you want to attach to your song; a checkbox
will appear next to each preset you've selected. When
you're done selecting presets, tap Save.
- Your selected presets will appear in the previous window. If needed,
you can rearrange this list by dragging the "grip" area
to the right of each preset. The first preset in
the list will be the default preset throughout the
app. Your changes will be saved when you navigate away from this song.

- Now navigate to a show or smart list that contains the song you edited. Most of the standard layouts include a MIDI button. If you're viewing a layout without a MIDI button, you can edit the layout to add one, or switch to the standard More Buttons layout. Then tap the MIDI button to send the data for the default preset, which is the first one in the list for that song (unless you change Settings > General Settings > Defaults > MIDI Preset).
- If you have attached more than one preset,
you can tap and hold the button until a submenu appears, then
tap the desired preset name to send its data.
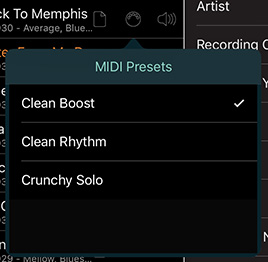
- If you want to access your default preset more quickly in the show view, navigate to Settings > App Control and set Send MIDI to Layout Actions > Song Selection. Then Set List Maker will send your preset data whenever you select a song in the show view, whether by tapping the song title, clicking a foot switch button, or swiping through your songs.
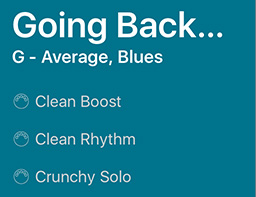
- If you want to access multiple presets more quickly in the show view, you can edit your layout and add Multiple MIDI Buttons to the set list or the song info area. Then Set List Maker will show a button for each of the attached presets when you select a song.
- If you want to trigger MIDI presets while performing a song in a completely automated way, you can record an automation track for the song and trigger each preset from the screen interface at the desired times. Then when you play back the automation track, Set List Maker will trigger the presets for you at the designated times.
- Normally you would attach multiple presets to a song if you want to send different MIDI messages at different times during the song. But you can also configure Set List Maker to send all the attached presets when you select a song, if you set Settings > App Control > Send MIDI to Layout Actions > Song Selection and turn on Settings > Audio & MIDI > MIDI Options > Send MIDI Presets Together.
- You might want to send two similar MIDI messages to turn a setting on and off on a device. In that case, you can create two MIDI presets, then edit the first one, click Pair With Preset, and select the second one to link them together. Then add just the first preset to your song. When you click its button, Set List Maker will send the first preset. When you click the button a second time, Set List Maker will send the second preset.
- If you have a MIDI preset that you want to access from any song, such as a preset that turns off vocal effects for song introductions, you can turn on the Pinned To All Songs option on its edit page. Then the preset will always be available from the MIDI button as if it is attached to every song. Pinned presets will not be included with the Send MIDI Presets Together function. If you send pinned presets and song presets from the same layout action, the pinned presets will be sent first. If you include the Multiple MIDI Buttons in your layout, you can set that to show only the song presets, only the pinned presets or both (the default is both).
Troubleshooting MIDI presets
If you've followed the steps above and things aren't working the way you expected, here are some things to check:
- Is Set List Maker sending the data? You can see this by clicking the MIDI button in the top toolbar and looking at the Activity Log.
- Is the other device receiving the data? Some devices have a light that blinks to show they're receiving, or they will do something that shows they are responding. If they don't show any response, you can check your networking setup.
- Is the other device doing the right thing? If it's responding but not doing the right thing, then it's just a matter of comparing your MIDI presets to what it says in the user manual and tweaking what you've entered.
And here are some problems we frequently see:
- By default, Set List Maker does not automatically send MIDI when you select a song. If you want this to happen, you can navigate to Settings > App Control and set Send MIDI to Layout Actions > Song Selection.
- The popular Yamaha MD-BT01 Bluetooth MIDI adapter does not support Android. However, some people have had success connecting to it from the free MIDI BLE Connect app instead of the Connect to a Bluetooth Device button within Set List Maker.
To send song select messages
Note: Song select messages are rarely used because they can only address 128 songs. The value of the Song Number field must be a single number between 0-127.
- Turn on Settings > Audio & MIDI > Assign Song Select Numbers. This is off by default because this type of MIDI message is often misunderstood.
- Navigate to the Songs list and tap a song.
- Scroll down to the MIDI Song Number field and enter a value from 0-127.

- Now navigate to a set list or smart list that contains the song you edited. Most of the standard layouts include a MIDI button. If you're viewing a layout without a MIDI button, you can edit the layout to add one, or switch to the standard More Buttons layout. Then tap the MIDI button to send the Song Select message.
To send tempo (beat clock) messages
Note: MIDI Beat Clock is not available on Android devices with less than Android 6.
- Navigate to Settings > Tempo & Pitch and turn on the "Send
MIDI beat clock"
option.

- Edit a song and enter a tempo value. You can enter a number, or use the Tap button to set a value.
- Save the song to reload the Songs list, or navigate to a show or smart list, and tap the Tempo button for a song. The icon will begin flashing, and the beat clock messages will be sent.
- To send the MIDI beat clock only to a specific port, you can change Settings > Tempo & Pitch > Tempo Options > Send Beat Clock to Port. Otherwise, it will be sent to all available ports.
- If you want to hear a click sound as a count-off, before the MIDI starts, you can set a value for Auto-Stop Bars, turn on Auto-Mute Instead of Auto-Stop and turn on Start MIDI on Auto-Mute. Then when you play a tempo, you will hear the click sounds until the auto-stop bars is reached. At that point, the click sounds will stop playing, the MIDI data will start sending and the tempo button will continue flashing.
To send non-standard tempo messages
You might need to send some MIDI other than the standard beat clock messages when you play tempos. You can configure Set List Maker to send a custom message on every beat whenever the tempo function is playing.
- Navigate to Settings > Tempo & Pitch and turn on the Send Custom MIDI option.
- In the ...With Code field below that option, enter the MIDI message you wish to send, in hexadecimal code. If needed, you can use an online tool to covert decimal to hexadecimal numbers.
- Navigate to a show or smart list, and tap the Tempo button for a song. The icon will begin flashing, and the custom messages will be sent.
- The Start MIDI On Auto-Mute setting described above also works with this function.
To play music from a Standard MIDI File
- On iOS, you must first obtain a SoundFont (.sf2) file. Copy the SoundFont file into the app, then select it from Settings > Audio & MIDI > MIDI SoundFont File. You can copy multiple SoundFont files into the app, then switch between them by changing this setting. You can also specify different SoundFonts for individual MIDI files using the SoundFont File setting on the recording edit page after adding the MIDI file. The Android app uses Android's default MIDI synthesizer, so you don't need to do this step, but you can't change from the default sounds.
- Create or obtain a Standard MIDI File (.mid) with musical content (MIDI note messages).
- Add the MIDI file to Set List Maker's data folder (optional).
- From the Songs list, create a new song, or select an existing song.
- Click Add Recordings and select the MIDI file from Set List Maker's data folder, or use the import button to copy it there. This links the MIDI file to the song.
- Click the song's Recording icon from anywhere in Set List Maker. You can pause or skip around in the MIDI file the same way you can with other recording formats.
To send data from a Standard MIDI File
Note: Sending data from a Standard MIDI File is only available on iOS and macOS.
- Create a Standard MIDI File (.mid) that sends MIDI messages.
- Add the MIDI file to Set List Maker.
- From the MIDI Presets list, create a new MIDI preset, or select an existing preset.
- Click Standard MIDI File and select the MIDI file. This links the MIDI file to the preset.
- Send the MIDI preset from anywhere in Set List Maker. Any data in the preset, plus the data in the file, will be sent. You cannot pause or stop the MIDI data once it starts sending, but it will stop when you navigate away from the current page.
- If you need to stop the MIDI file from going to all available MIDI ports, you can select a specific port in Settings > Audio & MIDI > Send SMF Data To Port. You can also select Set List Maker as the port, to send the SMF data back into Set List Maker as an alternative to an automation track.
To sync a Standard MIDI File with a recording
Note: Syncing a MIDI file with a recording is only available on iOS and macOS and only with the new audio engine (e.g., Settings > Advanced > Use Old Audio Engine off).
- Create a Standard MIDI File (.mid) that sends messages in time with an audio recording.
- Add the recording and the MIDI file to Set List Maker.
- From the Recordings list, select the recording to view its edit page.
- Click Standard MIDI File and select the MIDI file. This links the MIDI file to the recording.
- Play the recording from anywhere in Set List Maker. As it plays, the data in the MIDI file will be sent in time with the audio. If you pause, scrub or change the speed of the recording, the MIDI data will change to keep in sync.
- If you need to stop the MIDI file from going to all available MIDI ports, you can select a specific port in Settings > Audio & MIDI > Send SMF Data To Port. You can also select Set List Maker as the port, to send the SMF data back into Set List Maker as an alternative to an automation track.
To set up song data with MIDI Learn
- Edit a MIDI preset, then scroll down and tap the MIDI Learn button. It will
turn green when MIDI Learn is active:

- Send program or control changes or other MIDI messages from another MIDI device. Any incoming MIDI messages will automatically populate these fields while MIDI Learn is active. Any messages other than program and control changes will be added to the raw MIDI field. This does not include MIDI Realtime and Undefined messages, which Set List Maker will ignore.
- Program and control change messages will be saved for the MIDI Device that uses the same port (or All Ports) and channel as the device you send the messages from. If you do not have a matching MIDI Device set up, the program or control change message will be ignored.
- MIDI Learn requires that your target device sends MIDI when triggering a function as well as using incoming MIDI to trigger a function. To confirm that your target device is sending MIDI, you can click the MIDI icon in the top toolbar and look at the Activity Log.
- When you have finished populating the fields, tap the MIDI Learn button again to deactivate it.
User demos
Some Set List Maker users have created demos of their own setups:
- Sending program changes to Roland SPD-S
- Sending program changes to Yamaha DTX-Multi 12
- Sending program changes to Boss GT-10


